CHECKLIST: Before you start, gather the following to prep for your upgrade:
- Download the newest SF app package found at the link below and return to this page:
https://developers.cvent.com/docs/cvent-salesforce-app/app-installation
- Salesforce System Administrator credentials
- Cvent Administrator credentials (contact your Cvent Administrator prior to installing if you don’t already have Cvent Admin credentials)
- Cvent Salesforce Configuration Name and/or ID

PRO TIP: Note Your Cvent Configuration ID After Installing Version 8.0
Upgrade Steps from Version 7.1 or Higher
- Download the newest SF app package found at the link below and return to this page:
https://developers.cvent.com/docs/cvent-salesforce-app/app-installation
- Salesforce will alert you that it will take some time to install the app and can send an email notification when your install is complete. You can alternatively wait and refresh the Installed Packages page to verify that 8.0 is installed.
- As soon as the installation is complete, click on app launcher > search for Cvent Admin and click on that result under Items. This takes you directly to the Cvent Admin configuration tab.
- Before reconnecting, copy or screenshot your Configuration ID (image below). You will need this later.
- In the drop-down, select the Cvent environment (Production North America, EU, or Sandbox) and click on the Connect with Cvent button. You will be directed to Cvent's authentication page.
- Input your Cvent account number and click next. Then, provide your Cvent Administrator username and password. If you do not have Cvent Administrator credentials, please coordinate with a Cvent Administrator.
- When the connection is verified, you’re taken back to the Salesforce Cvent Admin page. A window with a drop-down will show your Cvent configurations as previously mentioned. Select the correct Cvent configuration to associate with this Salesforce org and click Connect.
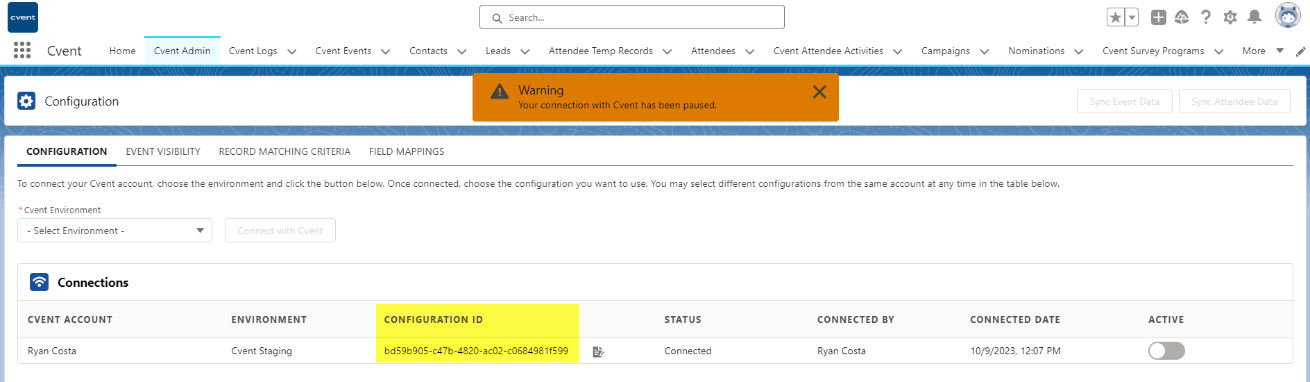
Note your Configuration ID

Reminder: If you select a different Configuration name/ID than what was originally connected to that Salesforce Org prior, any Cvent custom object data will be purged to make way for the new Cvent configuration. If this is unintended, please click Cancel instead of Connect and go to Cvent to reconfirm which configuration should be associated to that specific Salesforce Org.

Upgrade Steps from Versions 7.0 or lower
Please follow the steps 1 – 7 as detailed above to install and reconnect your Salesforce and Cvent account, then additionally perform the below steps:
- Click on the Setup gear icon in the top right of your Salesforce page > Setup.
- In the search bar of the Setup homepage, search for Visualforce Pages.
- In the listing, find App Configuration Page and click the Preview button.
- Once on the Cvent App Configuration Page, scroll down to the bottom and click on the Update Metadata API button.
If the Update Metadata button is greyed out or you receive an error, view this page as there may be an additional step required due to the Salesforce Winter 24 Update.
